- 0904 558 448
- Khuyến mãi
- Gửi Ticket
- Giới thiệu
- Việt Nam
- English
Ngày đăng: March 13, 2023
Yêu cầu: Cloud Server cài đặt image hệ điều hành CentOS 7.9 trên cụm máy chủ Việt Nam 03 và Việt Nam 01.
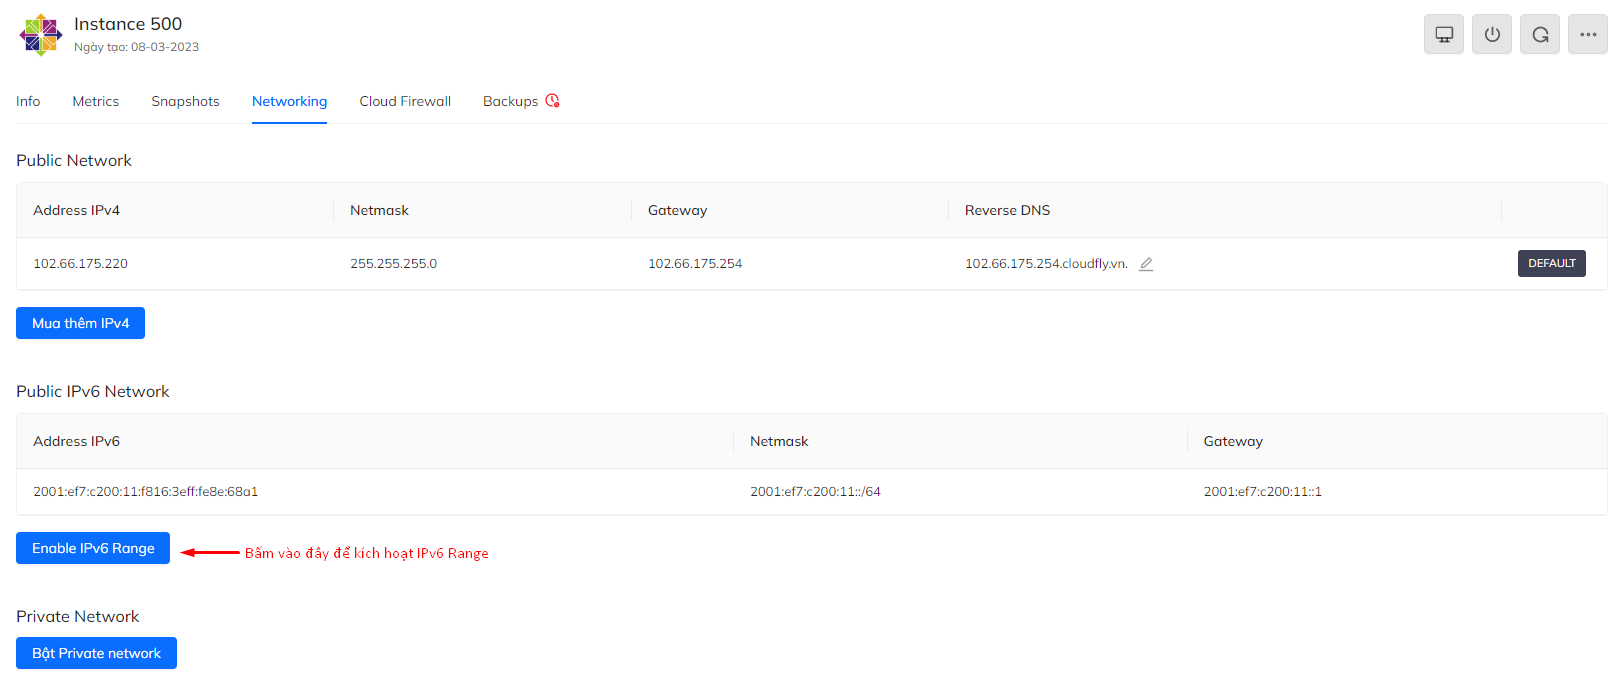
Bước 1: Enable IPv6 Range

Bước 2: Cấu hình IPv6
Address IPv6 là 2001:ef7:c200:11:f816:3eff:fe8e:68a1
Gateway là 2001:ef7:c200:11::1
- sed -i s/mirror.centos.org/vault.centos.org/g /etc/yum.repos.d/*.repo
- sed -i s/^#.*baseurl=http/baseurl=http/g /etc/yum.repos.d/*.repo
- sed -i s/^mirrorlist=http/#mirrorlist=http/g /etc/yum.repos.d/*.repo
- echo "sslverify=false" >> /etc/yum.conf
IPV6ADDR=<Address IPv6>
IPV6_DEFAULTGW=<Gateway>
Trong trường hợp này bạn sẽ có lệnh chạy như sau:
- IPV6ADDR=2001:ef7:c200:11:f816:3eff:fe8e:68a1
- IPV6_DEFAULTGW=2001:ef7:c200:11::1
- echo "IPV6_FAILURE_FATAL=no
- IPV6_ADDR_GEN_MODE=stable-privacy
- IPV6ADDR=$IPV6ADDR/64
- IPV6_DEFAULTGW=$IPV6_DEFAULTGW" >> /etc/sysconfig/network-scripts/ifcfg-eth0
- service network restart
- ping6 google.com.vn -c4
Output[root@instance-001 ~]# ping6 google.com.vn -c4
PING google.com.vn(hkg12s28-in-x03.1e100.net (2404:6800:4005:81c::2003)) 56 data bytes
64 bytes from hkg12s28-in-x03.1e100.net (2404:6800:4005:81c::2003): icmp_seq=1 ttl=114 time=26.8 ms
64 bytes from hkg12s28-in-x03.1e100.net (2404:6800:4005:81c::2003): icmp_seq=2 ttl=114 time=25.7 ms
64 bytes from hkg12s28-in-x03.1e100.net (2404:6800:4005:81c::2003): icmp_seq=3 ttl=114 time=25.8 ms
64 bytes from hkg12s28-in-x03.1e100.net (2404:6800:4005:81c::2003): icmp_seq=4 ttl=114 time=25.8 ms

--- google.com.vn ping statistics ---
4 packets transmitted, 4 received, 0% packet loss, time 3005ms
rtt min/avg/max/mdev = 25.781/26.064/26.813/0.447 ms
Nếu ping trả về gói tin thì cấu hình IPv6 đã thành công như trên và tiếp tục chuyển sang bước 3
Bước 3. Cài đặt Proxy IPv6 Range /64
- curl -sO https://raw.githubusercontent.com/cloudfly-vn/3proxy/main/ipv6-with-port-password.sh && chmod +x ipv6-with-port-password.sh && bash ipv6-with-port-password.sh
- curl -sO https://raw.githubusercontent.com/cloudfly-vn/3proxy/main/ipv6-with-port-same-username-password.sh && chmod +x ipv6-with-port-same-username-password.sh && bash ipv6-with-port-same-username-password.sh
Bước 4: Lấy thông tin và sử dụng
- cat /home/cloudfly/proxy.txt